Monday, July 25, 2011

Jeni's Ice Cream


If you’re not from Ohio, or haven’t made it to my Great State yet, I feel sorry for you. You haven’t seen some of the most culturally significant sites, like President Garfield’s hometown, or experienced the cultural diversity of Grandpa’s Cheesbarn and Gifts. Nor have you made it to the food Mecca that is Jungle Jim’s, spent the day at the Roller Coaster Capital of the World, visited Bruce Springsteen’s signature at the Rock & Roll Hall of Fame, or seen the world’s largest office building that resembles a wicker basket. You poor fools. But most importantly (unless you’ve shelled out $14 per pint a Dean & Deluca) you’ve never tasted Jeni’s Splendid Ice Creams. 

Jeni’s truly is splendid. With flavors like, Brown Butter Almond Brittle, Salty Carmel, Wildberry Lavender, and Rhubarb with Lime & Cardamom, why would you get some boring vanilla cone ever again?

Thankfully, it’s just the time of year to make one of my all-time favorite Jeni’s flavors: Goat Cheese with Red Cherries. Robbie and I signed up again this year for a local CSA box (small pitch here, for those of you that want to try it for a summer, there’s nothing better than getting fresh, organic vegetables, fruits, and eggs delivered to your doorstep every week and I would highly, highly recommend it). In the first fruit shipment this summer was a huge pint of tart cherries, perfect for Jeni’s Goat Cheese Ice Cream.  
 
Pitting them took over 30 minutes since you have to punch out each cherry pit using a device that looks like it came from Saw II. Surprisingly, I had one of these in my drawer from last summer. Among the kitchen supplies I was lacking – an ice cream maker. You know… nothing major – but more on that later. 


After pitting the cherries I roasted them in the oven for about 20 minutes at 450 degrees. The recipe actually doesn’t call for a specific amount but I ended up using about 1 ¼ cups for a quart of ice cream. I prepared the goat cheese mixture and simmered the sugars and cream together. When it boiled, it was time to add the corn starch and keep everything at a rolling boil (to thicken) before mixing it into the goat cheese. 

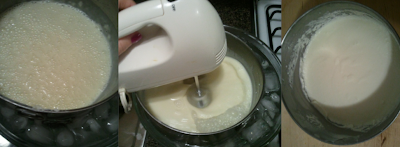
Then, it was time to make it into ice cream. What I really, really, really wanted was this (I mean how cool would to kick this things around Central Park a little and then have ice cream?!?!). But instead I had a giant mixing bowl filled with ice. I set the bowl containing the ice cream mixture on top of it and then mixed and mixed and mixed with the Big Lots Mixer. It was a labor of love. After about 15 minutes, and a couple of stops to drain out the water and add more ice, things started to thicken up and changed from the soup like mixture to a thick, cake batter consistency. 


Once it firmed up a little, I added the cherries layer by layer and then set the ice cream to freeze all the way. After 4 hours in the freezer it was time to enjoy my first bite, which tasted like the smug satisfaction of not having to shell out mad dollars to D&D for their overpriced ice cream – which is to say, it tasted splendid. 


Sunday, July 10, 2011

Fancytastic

It was Naqyia’s birthday this week, so I needed to outdo myself with cakes. Naqiya has gotten several birthday cakes through the years, so I had to think of some way to really wow her. After seeing a post on the I am Baker site, I knew exactly how to decorate it, but that’s only the cake wrapping paper. I needed the most delicious cake combination possible to help her start year 26 with a bang.

After making Naqiya and Abbas chocolate cakes, and cherry cakes, and coconut cakes, and white cakes with sprinkles, I decided on something truly elaborate – a cardamom vanilla cake, filled with raspberry compote, and topped with a lemon buttercream.
 
Oh? did I mention was July 6th and at least 100 degrees in my kitchen? I should have considered an ice cream cake. It’s ok – it’ll just be 5 easy steps… ANYTHING FOR NAQIYA!!!

Step 1: I had some cardamom pods around, but the recipe calls for ground cardamom. So how did I go from a little green pod to a spice you can put in a cake – well a spice grinder would do the trick, but seeing as I only have a blender acquired from one of grandma’s trips to Atlantic City (grandma lugged that blender though the casino all day just for me to be able to make protein smoothies and the occasional blended margarita), I did this by hand. After shelling all of the cardamom pods I pounded the seeds into submission with the bottom of a glass- - just like my caveman baking ancestors of yore.

High tech baking 101
2 ¼ sticks of butter, a pint of heavy cream, and 4 eggs, some flour, sugar and spice, and I ended up with a delicious—and very healthy—cake batter. If you’re going to make the cake, I would suggest adding a little more vanilla and cardamom for a more flavorful batter. I ended up doubling the amount of both.  

Step 2: With the cakes out of the oven, it was time to set them up on my sophisticated cooling racks (aka on my dresser with the window open and a box fan pointed on them). I was careful not to funnel cake smell out window, into the path of any passing pigeons or motivated hobos. The proverbial pie on a windowsill is no excuse to a hungry birthday girl.

Step 3: Meanwhile, to make the raspberry filling, I simmered the raspberries with sugar and water. A lot of recipes will suggest using jam or jelly as a filling, but I like making it myself because you can control the sweetness. That way the filling actually adds something to the cake and it’s not just a mound of sugar with some icing.

I even bought some fancy baking tools. 

 
Step 4: Once the raspberry filling and cakes cooled off, I started the assembly process. I used the Magnolia Bakery buttercream recipe again and added the juice of a lemon instead of milk this time around. Learning from my George Washington cupcake mistakes, I made sure to add all 8 cups of powered sugar this time. 


Step 5: Then it was onto decorating. My earlier attempts didn’t come out the greatest, but that’s ok because you can just scrape the icing off and start over.


After a few practice rounds, and a lot of blood sweat and tears (all 3 literal), I ended up with something fit for a 26-year-old, reality-tv-loving, graduate-school-attending, bangle-wearing queen.


Happy Birthday Naqiya – I’ll start planning next year’s birthday cake soon!

Friday, July 1, 2011

Washington... Washington


Maybe it’s because I’ve been watching a lot of Netflix, particularly “The Revolution” as narrated by Kelsey Grammar, but I am certain there is no bigger badass than George Washington. People were like – “Oh hey George, could you do us a solid and win the war against the British? No biggie, but uh… we don’t yet have a military with real training, or guns and food, but … you can handle that, right?”  And Washington was like, “Sure, guys. No prob. Shouldn’t take too long to defeat the greatest military power of the age. Maybe afterward I can run whatever government you hippies dream up? I got you.”

You think Chuck Norris or John Wayne or the Dos Equis guys are BA? Not compared to George Washington. He was, and still is, the original badass. So hell yes I’m going to outline his profile in chocolate and immortalize him on top of a cupcake.

I started by laying down a piece of wax paper on top on some silhouettes of GW. After heating some chocolate chips in a double boiler and pouring it into a little baggie (re: Valentines Day Panty Cookie post) I was ready to pipe out an outline of Washington’s noggin. After the outline hardened, I filled it in with chocolate and set everything inside the refrigerator to harden up. 

Then it was onto to the cupcakes. I recently purchased the Magnolia Bakery cookbook so I was excited to turn my little kitchen into an award winning Bakery. I chose classic Magnolia chocolate cupcake with a vanilla buttercream. The cupcakes went together fairly easily, and with a standard sized oven, I was able to actually bake at a normal rate. After 40 minutes, the cupcakes were successfully baked.

Moving on to the vanilla buttercream, I whipped the butter and sugar together for several minutes to make sure that enough air was incorporated to make the frosting nice a fluffy. After the cupcakes cooled, I started icing. But something wasn’t right – the cupcakes looked really sad. 


At first I thought it was too warm (my kitchen was at least 85 degrees) and the icing was melting. After looking at the icing it seemed like maybe it just need another cup or two of powder sugar to hold everything together. So I scraped off the icing and added another 1½ cup of confectioners sugar to make everything more solid.

In a tiny kitchen, cupcake overflow happens
Icing take 2 and cupcakes look good, but seriously, but would GW want to adorn a plain black and white cupcake? I think not. So I mix a little gel food color with some sugar to create some red and blue topping for George to grace. Looks like freedom now.

With a little patriotic arranging we have ourselves a Cupcake Old Glory. Happy Birthday America and thanks for all your badass ways Mr. Washington.