Sunday, July 21, 2013

Cherry Bourbon pie

This week I got tart Michigan cherries in the farm share- perfect for a cherry pie. Add a little bourbon and you're in an even better situation. 

Pitting cherries... Why can't science grow them without pits ?

Adding apricots because there weren't enough cherries.

Ready to go. Bourbon already added.

The good stuff.

Finished product. Golden brown.

It felt like a lifetime before the pie was cool enough to eat. A couple of glasses of bourbon made the wait easier. 


Thursday, June 20, 2013

Straw-buried

Per usual, I went overboard. What to do with too many strawberries ? Make them into Jeni's roasted strawberry and buttermilk ice cream.

One of several baskets of strawberries. Probably should have stopped at basket 3.

Wash, cut, and roast the berries.

Purée roasted strawberries with sugar and lemon juice.

Prepare the ice cream base.

Mix the base and strawberries together.

Chill in an ice bath.

KitchenAid to the rescue!

Best ice cream I've ever made. Jeni gave me a few of her tips :) 
 
This was gone in about 2 days. Strawberries are paleo.... Right?


Wednesday, August 31, 2011

RIP hand mixer


Sad news sports fans -- the Big Lots Mixer has mixed its last batter. I'll spare you the gruesome details about how it spent its last moments on earth, but there was smoke and a lot of high pitched screaming (from me and the mixer). An eventual autopsy confirmed that the cause of death was a broken gear. It lived a long and fulfilling life and brought enjoyment to all who tasted its work. It will truly be missed.

Down a mixer, I was limited in my dessert making abilities. But I wasn't going to let this stop me from making a summer treat. In fact, I had the perfect backup. A few months ago, in a moment of genius (or Sudafed-induced hoarding) I found these awesome popsicle molds while I was waiting in line to get a prescription filled. I had an awful sinus infection and the only thing I wanted to eat was icecream and icey-juicys. In my delirium, I imagined myself making delicious homemade popsicles in my favorite flavors to ease my soar throat. In actuality, I spent several days on the couch sleeping, waking up to watch the Real Housewives of New Jersey, and whimpering. 


The popsicle molds sat on my shelf all summer, waiting. With recipe in hand, it was time to christen them. It actually turned out to be a very easy, refreshing dessert, and a great way to use delicious late summer flavors - like super sweet melons. 


I started by cubing half of a very ripe honeydew melon and pureeing it in a food processor. I then added some lime juice to help bring out the flavor of the melon. Finally, a little honey, though we didn't need very much additional sweetness because the melon was already like candy. The mixture is then strained through a fine colander to remove any un-pureed pieces. 


You can call it done here and pour the mixture into the mold if you want. I wanted the popsicles to taste a little more like ice cream though, so I mixed some Greek Yogurt and 1/2 and 1/2 into the mixture. The recipe made a little too much popsicle liquid for my molds, so I poured the rest into ice cube trays. You could put little popsicle sticks right into the ice cube trays if you didn't have molds, or maybe even use it to flavor water or perhaps a nice vodka soda if you omit the milk. 


After that, you just need to find room in your freeze and let everything chill out.

There you have it - a blender-less, but still wonderful dessert.

Sunday, August 21, 2011

My pie is better than Suzie's


After watching a MasterChef lemon meringue pie bake-off one night, I was motivated to make my own delicious citrus treat. For those of you who watch MasterChef, I think we can agree Suzie and her pie were lame. For those of you who say "what the hell is MasterChef", pickings on Hulu are a little slim over the summertime -- so take what you can get. It turned into an epic night of baking and I think the pictures more accurately depict the process than my words can. 

Candied limes: mandolin sliced, sugar water boiled, sugar coated

Pie crust: mix flour, shortening, and water, chill, then roll

Lime custard: zest and juice limes, mix add egg yolks, and heat over double boiler
Blackberry Compote: Reduce wine and sugar by 1/2 over medium heat. Fold in blackberries

Pie assembly: blind bake crust, layer blackberry compote, custard, and meringue
Brown meringue in oven for 5 minutes
Add candied limes -- enjoy

Lime custard:
Ingredients:
1 cup white sugar
2 tablespoons all-purpose flour
3 tablespoons cornstarch
1/4 teaspoon salt
1 1/2 cups water
3/4 cups lime juice
2 limes zested
5 tablespoons butter
4 egg yolks, beaten
1 blind baked pie crust 
blackberry compote from bon appetite magazine:
Ingredients:
1 cup fruity wine such as a Cab or Merlot
1/2 cup sugar
1/2 cup water 
3 cups blackberries


meringue:
Ingredients:
4 egg whites
I cup sugar tablespoons all-purpose flour
3 tablespoons corn syrup
pinch of salt

Directions:
Preheat oven to 350 degrees F (175 degrees C).

To Make Lime Meringue: In a medium saucepan, whisk together 1 cup sugar, flour, cornstarch, and salt. Stir in water, lime juice and zest. Cook over medium-high heat, stirring frequently, until mixture comes to a boil. Stir in butter. Place egg yolks in a small bowl and gradually whisk in 1/2 cup of hot sugar mixture. Whisk egg yolk mixture back into remaining sugar mixture. Bring to a boil and continue to cook while stirring constantly until thick. Remove from heat. Pour filling into baked pastry shell.

To Make Blackberry Compote: Bring red wine, sugar, and water to a simmer in a medium saucepan over high heat; reduce heat to medium and simmer until reduced to 1/2 cup, 20-25 minutes. Let cool. Add 3 cups berries; fold gently to coat.

To Make Meringue:  If toasting meringue in oven, preheat oven to 450°. Place egg whites in the bowl of a stand mixer fitted with a whisk attachment. Beat whites in mixer until soft peaks form. Set aside. Stir sugar, corn syrup, and 1/4 cup water in a medium saucepan over medium-low heat until sugar dissolves. Attach a candy thermometer to side of pan. Increase heat to medium-high and boil without stirring, occasionally swirling pan and brushing down sides of pan with a wet pastry brush, until thermometer registers 238°, 6-8 minutes. Remove pan from heat. Meanwhile, beat whites in mixer until soft peaks form. Beat in salt. Slowly pour hot sugar syrup down side of bowl into whites and beat until meringue is firm and glossy. Continue beating until cool, about 4 minutes. Spoon meringue over lime curd, leaving a 1" plain border, and sculpt decoratively. Tuck 1 cup berries in and around meringue.

Bake in preheated oven for 10 minutes, or until meringue is golden brown.


Thursday, August 4, 2011

Sweet Cherry Pie

Another shipment of tart cherries in the CSA box means enough to make my dad's all-time favorite dessert, cherry pie. It's another recipe from his mom, and just as delicious as the sugar cookies and strawberry jam. He has fond memories of spending the summer in Michigan and collecting as many cherries as possible to justify my grandma making a cherry pie. She wasn't always the most willing baker though, and I can understand why -- this pie is a lot of work! Somehow my dad was always able to convince her (I'm guessing a lot of whining was involved).

The first time I made this recipe was for Fathers Day. It required a trip out to a local farm where they imported Michigan cherries for a few weekends a year. After a few wrong turns, what should have taken 30 minutes ended up taking over 2 hours. But later, seeing how happy my dad was as the pie baked and wafted its sweet cherry pie smell into the kitchen, the longer than expected journey (and four dollars for cherries) seemed a small price to pay.
 I included the recipe below just in case anyone has pie-loving man-children in their lives.

Already knowing the work that was ahead of me (making a pie crust, pitting four cups of cherries, assembling the pie, and sitting in a broiling apartment as the pie bakes) I summoned my strength, downed a diet coke, and got to work.


I knew that I was getting better at this whole baking thing when it only took me one try to roll out the pie crust. Look how perfect that circle of dough is! No tears, no flaking, no need to remix water in, re-chill, and re-roll the crust like usual. I'm a pro these days: commissions and/or congratulations are appreciated. 


With a perfect pie crust all ready, I made up the cherry filling by boiling cherries, sugar, corn starch, and some water to cook the cherries a little and thicken up the mixture. What you get it this:


I was feeling kind of lazy that night, so instead of making a lattice top which would require making another pie crust, cutting 20 perfect 1 inch strips, and practicing my basket weaving skills, I decided on a streusel topping to just throw over everything. 


After 45 minutes in the oven, the pie was ready. I of course sent a picture to my dad and told him how yummy it was. I can safely say that it not only brought a tear to his eye, but also made a grown man cry, since he was several states away and couldn't have any. Whitesnake really knows what they're taking about. That's the power of cherry pie. 


Even cats love it  


Grandma Rose's Cherry Pie 

4 C pitted tart cherries
1 ¼ C sugar
3 ½ Tbls cornstarch
1 Tbls butter
¼ tsp almond extract

-Combine cherries, sugar & cornstarch and let stand for 10 minutes.

-Bring to a boil over medium heat, stirring constantly.

-Let boil for 5 minutes or until juice is translucent.

-Stir in butter and almond extract

Pour into pie crust & top with crust.  Cut slits to let out steam.  Bake at 375 F for 45 – 55
Minutes or until crust is brown.

Monday, July 25, 2011

Jeni's Ice Cream


If you’re not from Ohio, or haven’t made it to my Great State yet, I feel sorry for you. You haven’t seen some of the most culturally significant sites, like President Garfield’s hometown, or experienced the cultural diversity of Grandpa’s Cheesbarn and Gifts. Nor have you made it to the food Mecca that is Jungle Jim’s, spent the day at the Roller Coaster Capital of the World, visited Bruce Springsteen’s signature at the Rock & Roll Hall of Fame, or seen the world’s largest office building that resembles a wicker basket. You poor fools. But most importantly (unless you’ve shelled out $14 per pint a Dean & Deluca) you’ve never tasted Jeni’s Splendid Ice Creams. 

Jeni’s truly is splendid. With flavors like, Brown Butter Almond Brittle, Salty Carmel, Wildberry Lavender, and Rhubarb with Lime & Cardamom, why would you get some boring vanilla cone ever again?

Thankfully, it’s just the time of year to make one of my all-time favorite Jeni’s flavors: Goat Cheese with Red Cherries. Robbie and I signed up again this year for a local CSA box (small pitch here, for those of you that want to try it for a summer, there’s nothing better than getting fresh, organic vegetables, fruits, and eggs delivered to your doorstep every week and I would highly, highly recommend it). In the first fruit shipment this summer was a huge pint of tart cherries, perfect for Jeni’s Goat Cheese Ice Cream.  
 
Pitting them took over 30 minutes since you have to punch out each cherry pit using a device that looks like it came from Saw II. Surprisingly, I had one of these in my drawer from last summer. Among the kitchen supplies I was lacking – an ice cream maker. You know… nothing major – but more on that later. 


After pitting the cherries I roasted them in the oven for about 20 minutes at 450 degrees. The recipe actually doesn’t call for a specific amount but I ended up using about 1 ¼ cups for a quart of ice cream. I prepared the goat cheese mixture and simmered the sugars and cream together. When it boiled, it was time to add the corn starch and keep everything at a rolling boil (to thicken) before mixing it into the goat cheese. 

Then, it was time to make it into ice cream. What I really, really, really wanted was this (I mean how cool would to kick this things around Central Park a little and then have ice cream?!?!). But instead I had a giant mixing bowl filled with ice. I set the bowl containing the ice cream mixture on top of it and then mixed and mixed and mixed with the Big Lots Mixer. It was a labor of love. After about 15 minutes, and a couple of stops to drain out the water and add more ice, things started to thicken up and changed from the soup like mixture to a thick, cake batter consistency. 


Once it firmed up a little, I added the cherries layer by layer and then set the ice cream to freeze all the way. After 4 hours in the freezer it was time to enjoy my first bite, which tasted like the smug satisfaction of not having to shell out mad dollars to D&D for their overpriced ice cream – which is to say, it tasted splendid. 


Sunday, July 10, 2011

Fancytastic

It was Naqyia’s birthday this week, so I needed to outdo myself with cakes. Naqiya has gotten several birthday cakes through the years, so I had to think of some way to really wow her. After seeing a post on the I am Baker site, I knew exactly how to decorate it, but that’s only the cake wrapping paper. I needed the most delicious cake combination possible to help her start year 26 with a bang.

After making Naqiya and Abbas chocolate cakes, and cherry cakes, and coconut cakes, and white cakes with sprinkles, I decided on something truly elaborate – a cardamom vanilla cake, filled with raspberry compote, and topped with a lemon buttercream.
 
Oh? did I mention was July 6th and at least 100 degrees in my kitchen? I should have considered an ice cream cake. It’s ok – it’ll just be 5 easy steps… ANYTHING FOR NAQIYA!!!

Step 1: I had some cardamom pods around, but the recipe calls for ground cardamom. So how did I go from a little green pod to a spice you can put in a cake – well a spice grinder would do the trick, but seeing as I only have a blender acquired from one of grandma’s trips to Atlantic City (grandma lugged that blender though the casino all day just for me to be able to make protein smoothies and the occasional blended margarita), I did this by hand. After shelling all of the cardamom pods I pounded the seeds into submission with the bottom of a glass- - just like my caveman baking ancestors of yore.

High tech baking 101
2 ¼ sticks of butter, a pint of heavy cream, and 4 eggs, some flour, sugar and spice, and I ended up with a delicious—and very healthy—cake batter. If you’re going to make the cake, I would suggest adding a little more vanilla and cardamom for a more flavorful batter. I ended up doubling the amount of both.  

Step 2: With the cakes out of the oven, it was time to set them up on my sophisticated cooling racks (aka on my dresser with the window open and a box fan pointed on them). I was careful not to funnel cake smell out window, into the path of any passing pigeons or motivated hobos. The proverbial pie on a windowsill is no excuse to a hungry birthday girl.

Step 3: Meanwhile, to make the raspberry filling, I simmered the raspberries with sugar and water. A lot of recipes will suggest using jam or jelly as a filling, but I like making it myself because you can control the sweetness. That way the filling actually adds something to the cake and it’s not just a mound of sugar with some icing.

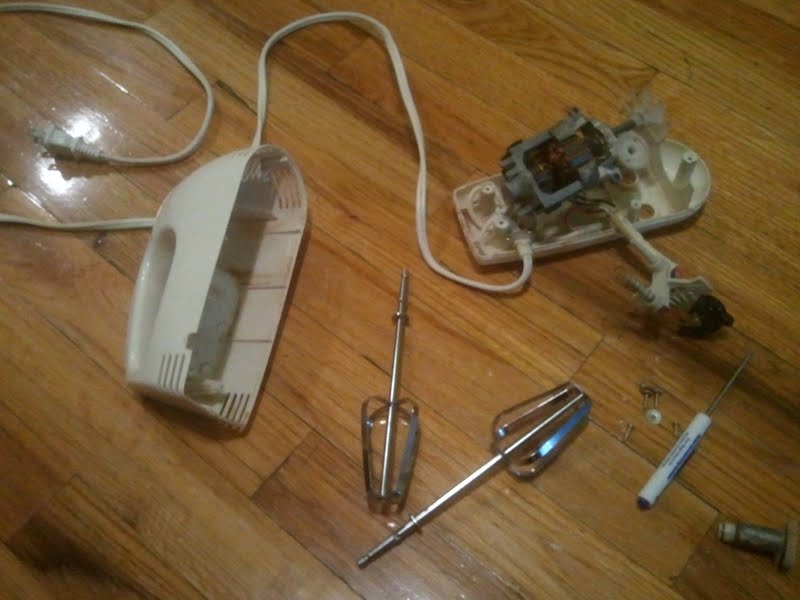
I even bought some fancy baking tools. 

 
Step 4: Once the raspberry filling and cakes cooled off, I started the assembly process. I used the Magnolia Bakery buttercream recipe again and added the juice of a lemon instead of milk this time around. Learning from my George Washington cupcake mistakes, I made sure to add all 8 cups of powered sugar this time. 


Step 5: Then it was onto decorating. My earlier attempts didn’t come out the greatest, but that’s ok because you can just scrape the icing off and start over.


After a few practice rounds, and a lot of blood sweat and tears (all 3 literal), I ended up with something fit for a 26-year-old, reality-tv-loving, graduate-school-attending, bangle-wearing queen.


Happy Birthday Naqiya – I’ll start planning next year’s birthday cake soon!